
North Sign Water Setup
Location 1 - The water spicket on the back of our fine neighbor's house
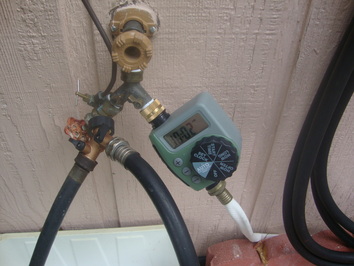
This is the finished product. The components are:
1. The main faucet from the house (brown)
2. A "Y" connector with one side going to our timer and the other side going to household use, in this case another "Y" to serve the yard hose and the dog dish.
3. Our timer
4. The wite hose connection going down to the north sign (Location 2).
1. The main faucet from the house (brown)
2. A "Y" connector with one side going to our timer and the other side going to household use, in this case another "Y" to serve the yard hose and the dog dish.
3. Our timer
4. The wite hose connection going down to the north sign (Location 2).
|
Very simple manual - one page in English and one in Spanish
|
| ||
|
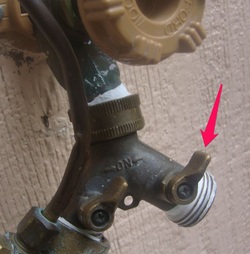
The shutoff valve shown with the arrow is now in the off position. This is the way you will find it in the spring when one goes to install the timer, and the way it should be left when the time is removed.
Note the use of teflon tape. This should be refreshed in the spring when the time is installed. |
|
Tools: Spring: the wrench you prefer when tightening hose fittings, Teflon Tape and possibly the washers typically found inside the female hose connector.
Fall: Just the wrench.
Fall: Just the wrench.
|
In the spring:
Close the valve described below that is at Location 2 (below). 1. Put a new battery AA batteries in the unit 2. Check programming as described in the next section 3. Teflon tape the threads 4. Install the timer 5. Connect the hose 6. Open the shutoff valve (reminding yourself that the valve at the sign has been closed) 7. Check for leaks |
In the fall:
Do this step at the house first before draining the system described below. 1. Turn off the shutoff valve going to the timer 2. Take off the white hose 3. Take off the timer 4. Check and fix any leaks 5. Remove and dispose of batteries (In the fall of 2014 the owners swamper had not been winterized so we left the main brown faucet open with the sprinkler valve shut as shown above.) |
|
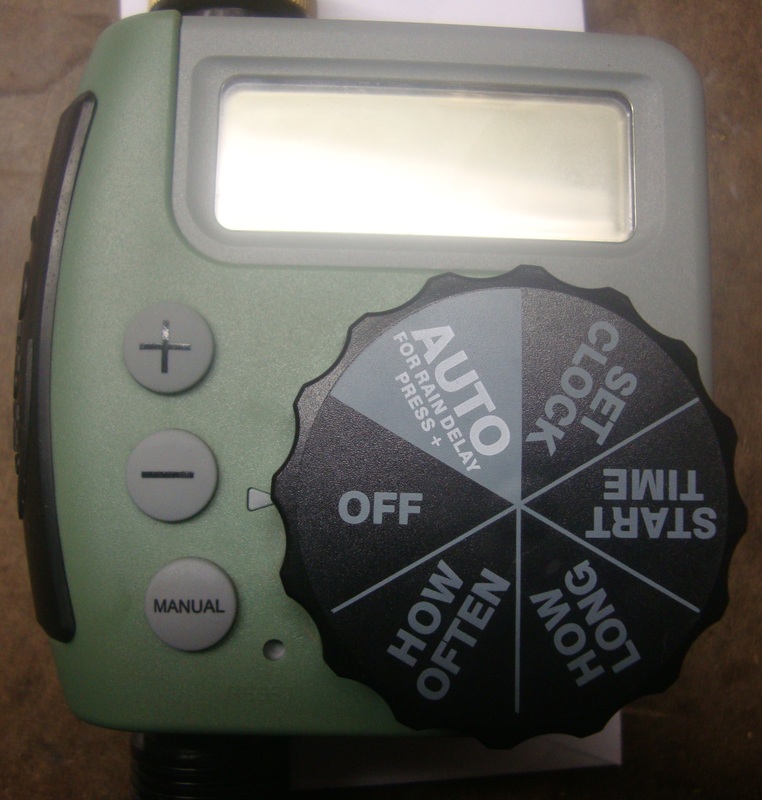
Programming: VERY SIMPLE. The programming should be checked prior to installing. You can look at the manual provided from above download if necessary. Each factor is shown on the rotating wheel and should be set moving counter-clockwise as follows:
SET CLOCK: Current time (careful on AM or PM) START TIME: 6:30 AM HOW LONG: 45 Minutes HOW OFTEN: 2 days (this could be open for discussion and consider 3 days) OFF: Do NOT leave it "off" AUTO: Yes, leave it on AUTO Once programmed you should move the wheel around counter-clockwise to review. |
Check carefully for leaks - This is very important in maintaining an excellent relationship with our generous neighbor. In the past we have redone the teflon where needed, tightened where needed, and even replaced the entire house faucet when it leaks.
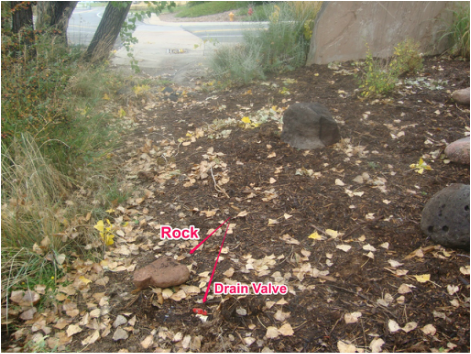
Location 2: The north sign dripper system.
When standing on the north boundary of the sign area, furthest from Cedar, about a quarter of the way to the road you sill see a rock. It covers a ball valve. Open drains the hose from the house (if disconnected) and closed is ready for operation. The rock hides the valve. Open all winter; closed all summer.
When standing on the north boundary of the sign area, furthest from Cedar, about a quarter of the way to the road you sill see a rock. It covers a ball valve. Open drains the hose from the house (if disconnected) and closed is ready for operation. The rock hides the valve. Open all winter; closed all summer.